Introduction
In a microservice architecture, with many services in place it’s critical to easily manage configurations and profile. If you are using Spring, you might have heard of Spring Cloud Config, in particular, Config Server which:
provides an HTTP resource-based API for external configuration (name-value pairs or equivalent YAML content). The server is embeddable in a Spring Boot application, by using the
@EnableConfigServerannotation. Consequently, the following application is a config server.
In this article, we will see you how to quickly set up a Spring Cloud Config Server using the CLI.
Context
While developing, I wanted to have a local Config Server for testing the refresh scope of properties before pushing my application to the DEV environment.
However, I wanted to achieve this without having to use Dockerfiles or creating a Spring Boot app.
That’s when I found the Spring Boot Cloud CLI, which enhances the Spring Boot CLI and makes local development even easier.
This CLI allows you to quickly:
- develop a Spring application;
- run Groovy scripts;
- launch Spring Cloud services (Eureka, Zipkin, Config Server)
- encryption and decryption.
All of this from the command line and without having to bootstrap a whole application.
As such, I’m now sharing how easy it is to install, set up, and use.
Installation
To install the CLI’s I’m using Brew, and it’s as easy as:
# installing spring boot cli
$ brew tap pivotal/tap
$ brew install springboot

# check if the installation was succesfull
$ spring version

# install spring cloud cli (you can use other versions)
$ spring install org.springframework.cloud:spring-cloud-cli:2.2.1.RELEASE

# check if the installation was succesfull
$ spring cloud --version

# should output a list of cloud services: configserver dataflow eureka h2 hystrixdashboard kafka stubrunner zipkin
$ spring cloud --list
If you also want to use the encryption/decryption features of Spring Cloud Config Server you need to have this in mind:

If you are using Java 8 it already comes with the JCE downloaded. You only need to open the java.security file (in my case since I’m using jEnv) which is under the directory $HOME/1.8/jre/lib/security/, and make sure the following line is uncommented:
crypto.policy=unlimitedUsage
The simplest way to use it is by taking advantage of the default Spring Cloud Launcher, and to do so create a folder structure like:
demo
│ - bootstrap.properties
| - launcher
│  │ - application.yml
We will use the boostrap.properties to say to the Spring Cloud application our encryption key to use while on the application.yml we will add application-specific properties. If you are confused about the meaning and need of these property files, check out this awesome post from Bealdung explaining these files.
Your root folder could have whatever name you want. However, in order to use the default Launcher leave the sub-folder name as is.
Continuing with our setup, on your boostrap.properties file add:
encrypt.key=fooOn your application.yml file add:
encrypted_credential: "{cipher}da9937d6d61c28bdb80cbcf158e1492a568643a16bde71ec3e9a139b47e24e40"
this:
  is:
   awesome: true
To run the local Config Server, on your demo folder run:
$ spring cloud configserverNow if you go to http://localhost:8888/config-client/default you will see something like:
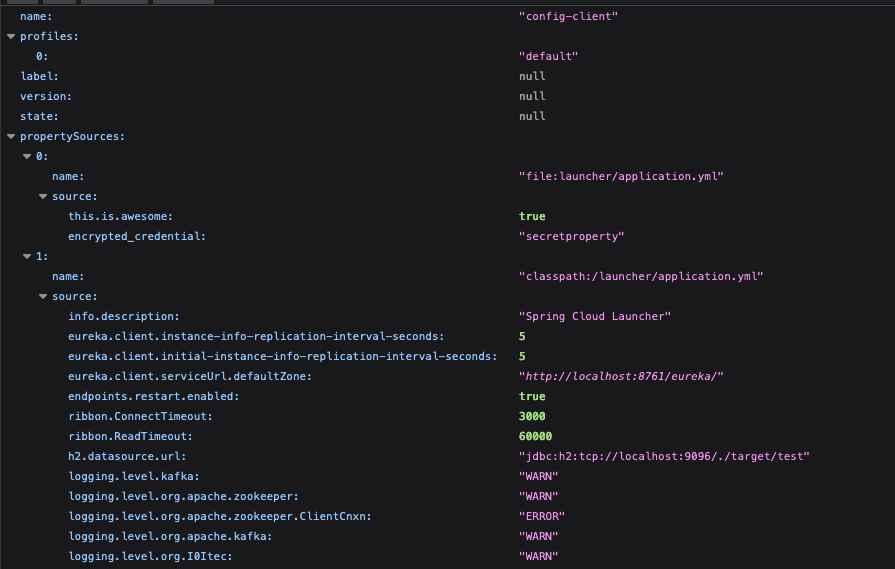
As expected we have a this.is.awesome_ property set to true and our encrypted_credential was correctly decrypted to secretproperty.
You can also play around with other things like:

Encrypting/Decrypting properties by passing an encryption key to use
In this case, the encrypting and decrypting of the properties are done via CLI without having to launch a Config Server.
Or you can also do:

In which the encrypting and decrypting of the properties is done against a Config Server application that is running.
References
Check out the great documentation and tools that made this possible:
- Spring Boot CLI Documentation
- Spring Cloud CLI Documentation
- Introducing the Spring Cloud CLI Launcher
- Introduction to Spring Cloud CLI
- Spring Configuration Boostrap vs Application Properties
- Brew
- jEnv
Final Notes
This is only the start! I bet there are more functionalities to explore with both of these CLIs. Any questions feel free to reach me and if you have any extra feedback please let me know.
Thank you for reading! 😃
GitHub: https://github.com/gonmmarques
LinkedIn: https://www.linkedin.com/in/goncalommarques/
Original post on Medium.